Email Campaign QA Checklist: What to Test Before You Send
An email campaign QA checklist protects more than spelling. A campaign can be beautifully written and still fail because the wrong segment received it, a personalization token had no fallback, a button opened the staging site, or the hero image became unreadable on a phone.
The safest pre-send process checks the message as a system: audience, envelope, copy, creative, links, tracking, rendering, accessibility, compliance, and approval state. This guide gives email marketers, CRM teams, designers, and reviewers one repeatable sequence to use before a newsletter, promotion, product launch, or lifecycle email leaves the queue.
If your biggest risk is text embedded inside banners and promotional modules, Gard's guide for email marketing teams explains where visual proofreading fits into the wider campaign workflow.
Email campaign QA checklist: the short version
- Confirm the campaign goal, owner, audience, send time, and final version.
- Check the from name, from address, reply-to address, subject line, and preheader.
- Validate segments, exclusions, suppression rules, and test-account handling.
- Test every personalization token, fallback value, and dynamic content rule.
- Proofread body copy, buttons, banners, product details, dates, prices, and disclaimers.
- Open every link and confirm the destination, protocol, parameters, and tracking.
- Review desktop, mobile, dark mode, image-off, and major inbox previews.
- Check hierarchy, contrast, alt text, readable type, and keyboard-friendly linked content.
- Verify sender identity, postal address, unsubscribe flow, consent rules, and required legal copy.
- Send a final proof, record approval, schedule carefully, and prepare post-send monitoring.
1. Lock the campaign scope and final version
QA becomes unreliable when reviewers are looking at different versions. Before checking details, identify the exact campaign, template, audience, locale, promotion, launch date, and automation step being approved. Pause nonessential edits while the final review is happening, or require any later change to trigger another targeted test.
- Name one final owner. Someone should know which version is authoritative and whether the campaign is cleared to schedule.
- Write down the intended outcome. A sales email, event reminder, onboarding message, and account notice have different success criteria and risk levels.
- Check dependencies. Confirm that the offer is live, inventory is available, landing pages are published, coupon rules are configured, and customer support knows what is being sent.
2. Review the email envelope first
Subscribers see the inbox envelope before they see the design. Check the from name, sending address, reply-to address, subject line, and preheader together. They should accurately describe the message, make sense as a pair, and avoid accidental repetition when an inbox displays both subject and preview text.
- Send a reply to the reply-to address and confirm that it reaches a monitored inbox.
- Check spelling, punctuation, capitalization, emoji rendering, offer language, and date references.
- Make sure the preheader does not expose template instructions, raw code, or unrelated body copy.
- Compare every A/B-test variant, not only the control.
3. Validate the audience, exclusions, and personalization
An accurate message sent to the wrong people is still a failed campaign. Review the inclusion logic and the people who must be excluded: unsubscribed contacts, suppressed addresses, employees, recent purchasers, incompatible regions, ineligible accounts, or customers already enrolled in another flow.
Then test personalization with realistic records. Use a complete profile, a profile with missing fields, an unusually long name, non-ASCII characters, and every meaningful customer or product state. Every token should have a sensible fallback, and dynamic blocks should have an explicit default behavior.
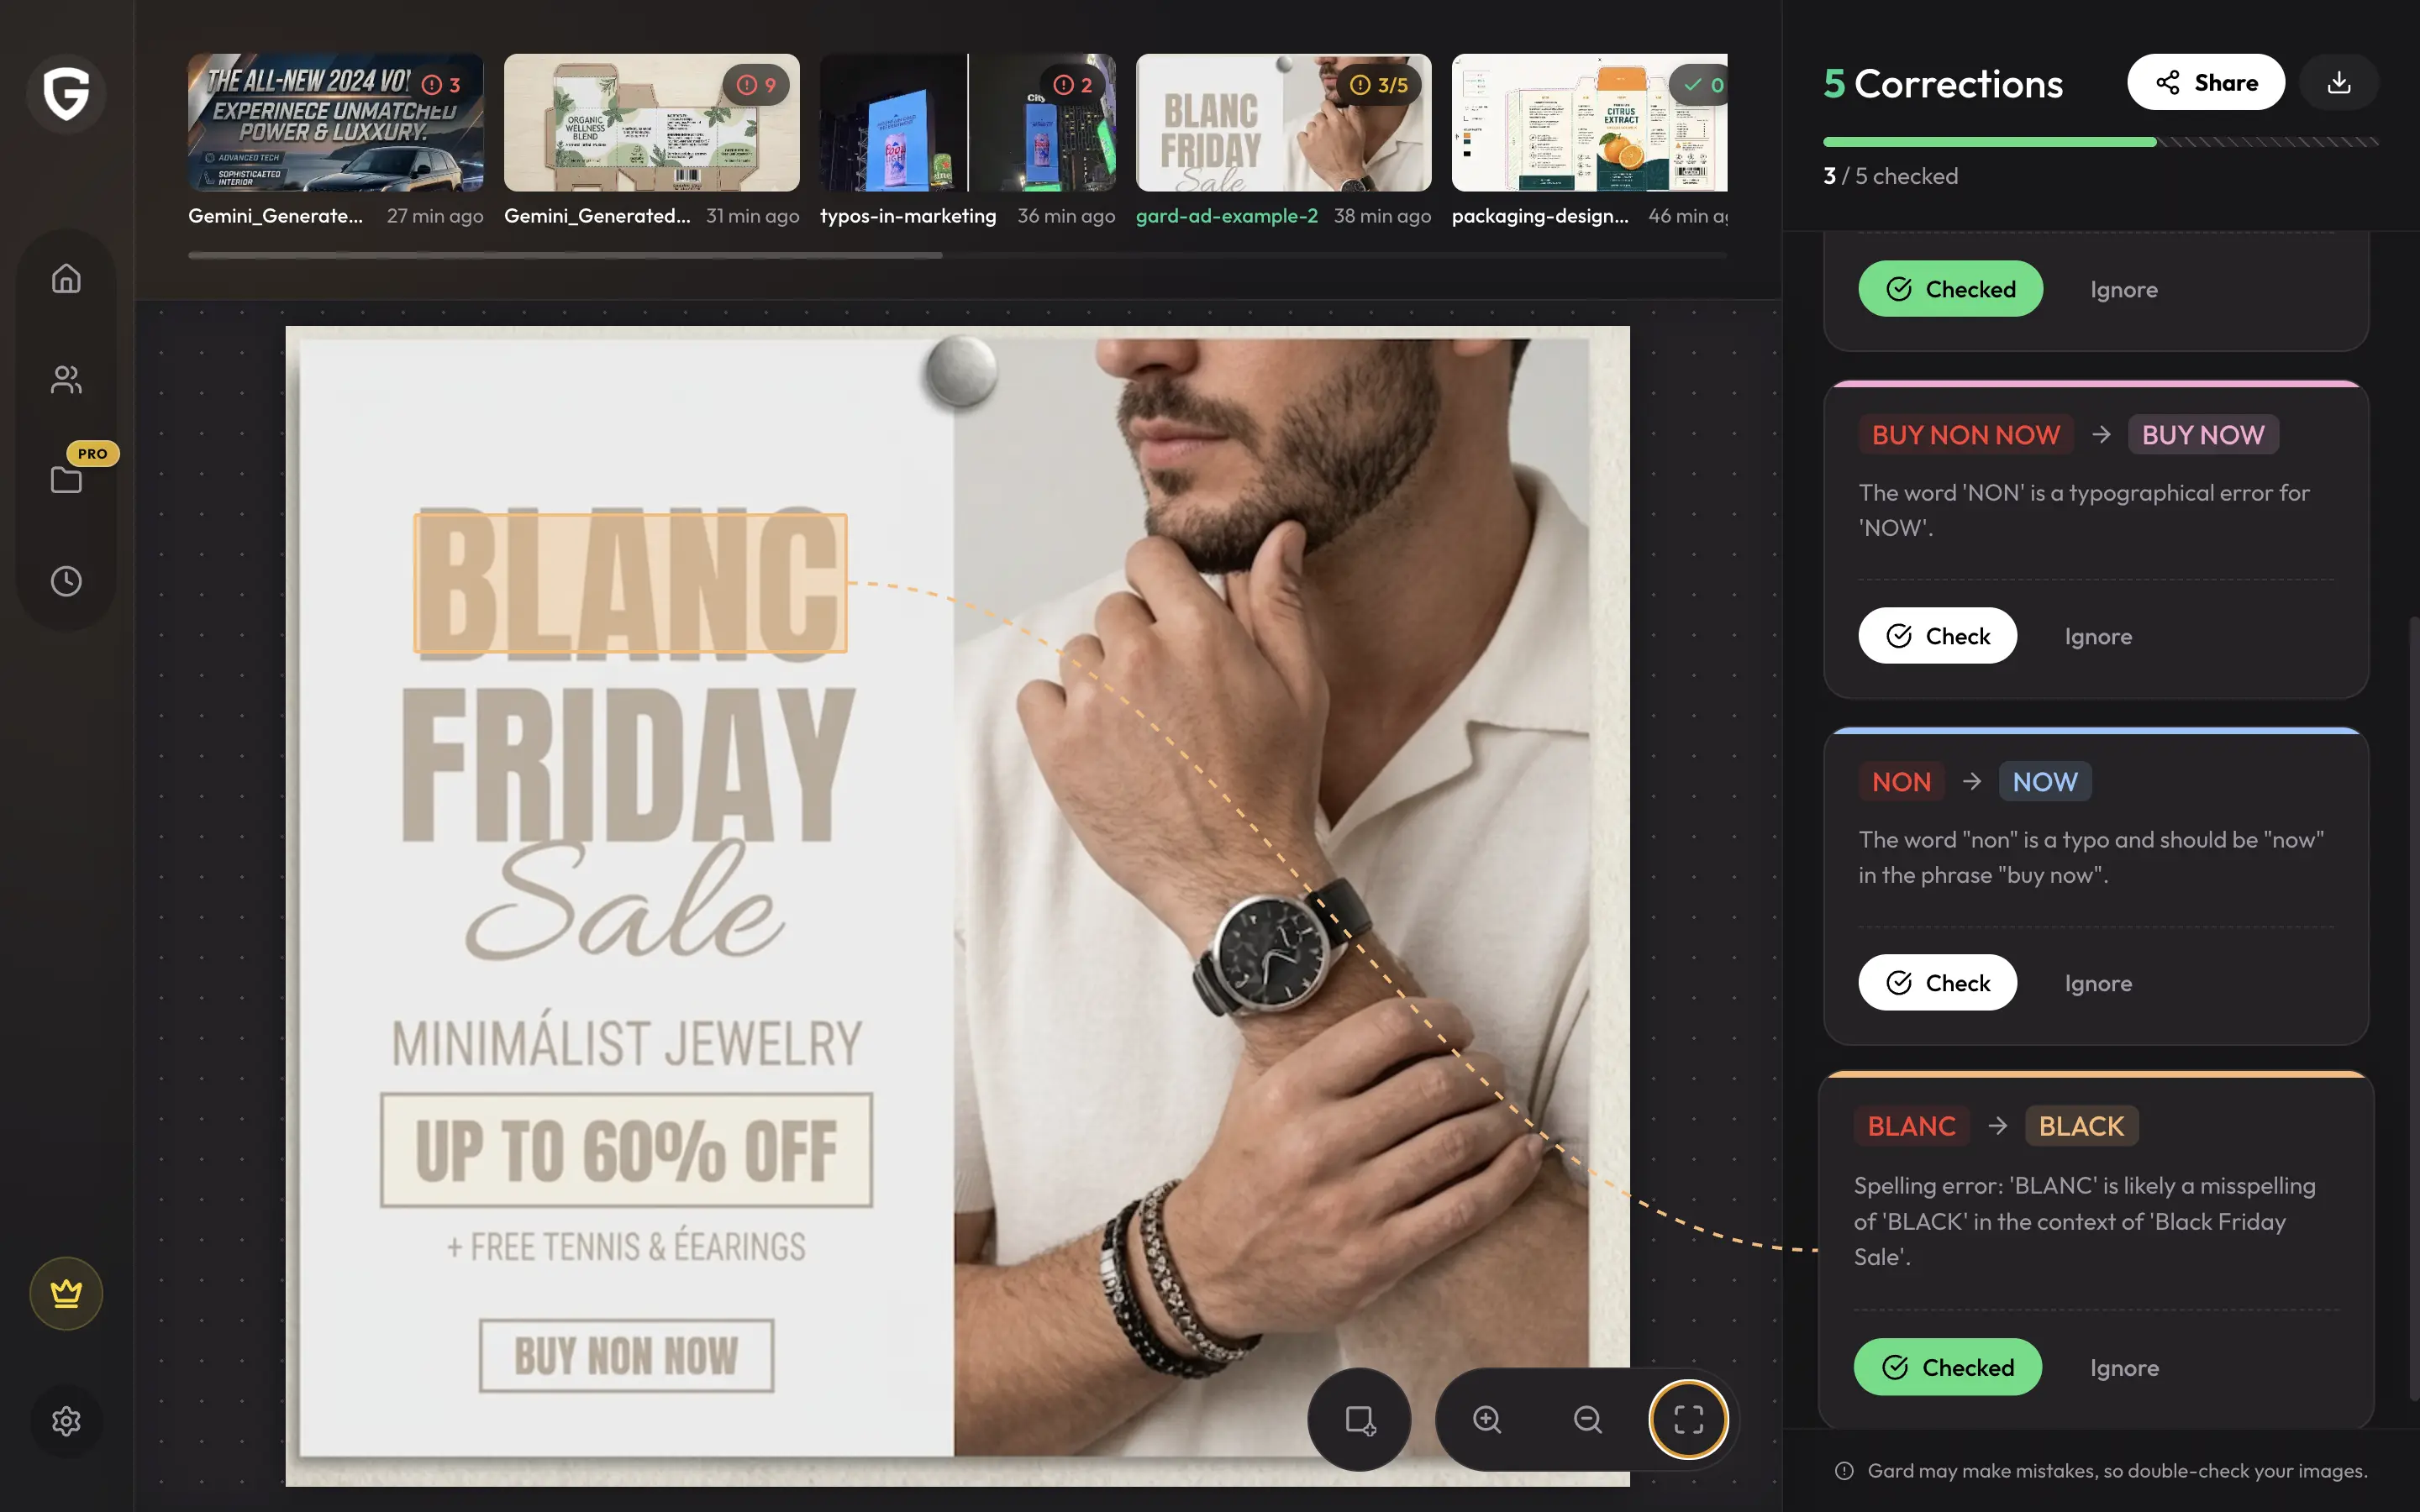
4. Proofread copy and visual creative separately
Read the email once for meaning and once for mechanics. The meaning pass checks whether the promise, audience, offer, and call to action are clear. The mechanics pass checks spelling, grammar, punctuation, dates, prices, discount math, product names, legal qualifiers, and consistency.
Do not stop at editable HTML text. Headline copy, coupon codes, countdown labels, product details, and disclaimers are often baked into images. Use an image spell checker on the exported creative, then compare the result with the approved source copy. Gard can help catch text issues inside flattened banners that a browser or email editor cannot inspect.
For a broader review framework, see what design proofing includes. If you need the words from a flattened asset for a side-by-side comparison, use the image to text tool.
5. Test every link, button, and tracking parameter
Click every linked element in the final proof, including the logo, navigation, hero image, buttons, text links, product cards, social icons, preference center, privacy link, and unsubscribe link. Do not assume repeated modules share the same URL.
- Confirm that each destination is live, secure, and appropriate for the recipient's locale and device.
- Remove staging domains, placeholder anchors, malformed URLs, duplicated parameters, and old campaign codes.
- Check that UTM values follow your naming standard and identify the correct source, medium, campaign, content, and variant.
- Complete the important conversion path. A landing page loading is not enough if the form, cart, coupon, login, or download fails.
6. Review rendering beyond one desktop preview
A test send to one inbox is useful, but it is not a complete rendering test. Review the campaign at narrow and wide widths, with images enabled and disabled, and in light and dark environments. Use your email platform's preview tools or a dedicated rendering service for the inboxes that matter to your audience.
- Look for clipped headlines, tiny type, horizontal scrolling, broken columns, extra spacing, and buttons that are hard to tap.
- Check whether transparent logos, icons, and text-in-image assets disappear or gain awkward backgrounds in dark mode.
- Confirm that useful meaning remains when images are blocked or slow to load.
- Make sure the plain-text version is readable and its links are correct.
7. Add an accessibility pass
Accessible email is clearer email. Keep important information in live text when possible, use descriptive link language, preserve a logical reading order, and make buttons large enough to identify and activate. Informative images need concise alternatives; purely decorative images should generally use empty alt text so they do not add noise. The W3C alt-text decision tree is a useful reference.
Also check text and images of text for readable contrast. W3C's contrast guidance explains the commonly used minimum ratios. Remember that a perfect alt attribute does not rescue a campaign whose only useful offer details are trapped inside a low-contrast image.
8. Verify compliance and sender identity
Important: this checklist is operational guidance, not legal advice. Requirements vary by message type, audience, and jurisdiction, so involve qualified counsel or your compliance team when needed.
For U.S. commercial email, the FTC's CAN-SPAM compliance guide says header information and subject lines must not be deceptive, commercial messages need a valid postal address and a clear opt-out method, and opt-out requests must be honored according to the rule. Test the actual unsubscribe flow instead of merely checking that a footer link exists.
- Confirm the visible sender, business identity, postal address, and required disclosures.
- Open the unsubscribe and preference links from a real test message.
- Verify that consent, suppression, and retention rules match the recipient's jurisdiction and your internal policy.
- Keep transactional and promotional content classified correctly for your workflow.
9. Run a final proof and approval sequence
Send the final campaign to a small proof list that includes the marketer, copy reviewer, designer, campaign operator, and any required legal or product owner. Ask reviewers to approve defined areas instead of replying with a vague thumbs-up. After the last correction, retest the changed element and any dependent content.
| Reviewer | Primary responsibility | Approval evidence |
|---|---|---|
| Campaign owner | Goal, audience, schedule, offer, and final status. | Campaign record or approval comment. |
| Copy or brand | Message, grammar, terminology, claims, and tone. | Approved proof or tracked review. |
| Design | Creative version, hierarchy, mobile behavior, and image copy. | Final exported assets. |
| Marketing operations | Segments, tokens, links, tracking, rendering, and scheduling. | Test-send and platform checks. |
| Legal or compliance | Required review for claims, consent, disclosures, and jurisdiction. | Recorded approval when applicable. |
10. Prepare for the first hour after send
QA should include a response plan. Know who will watch delivery errors, replies, broken destinations, coupon failures, support tickets, and unusual analytics. Keep a correction path ready for landing pages and automations. For scheduled or recurring campaigns, record the issue and fix the source template rather than patching only one send.
How Gard fits into email campaign QA
Gard focuses on a specific blind spot: customer-facing text after it has become part of a visual asset. Upload exported email banners, promotional modules, countdown graphics, product callouts, and lifecycle images to review spelling, grammar, punctuation, awkward wording, and context inside the design.
That visual check complements your email platform's audience validation, link testing, personalization preview, and inbox rendering. It does not replace them. The strongest workflow combines automated checks with accountable human approval, especially for high-volume or high-stakes campaigns. Teams that also publish paid social creative can reuse the same habits behind these common grammar checks for ads.
Email campaign QA FAQ
How long should email QA take?
A simple, familiar newsletter may need a focused 10- to 20-minute final pass. New templates, complex segmentation, dynamic content, major launches, and regulated claims need more time and more reviewers. The useful measure is coverage of risk, not speed alone.
When should the final QA happen?
Run the full check after copy, creative, audience rules, links, and template assembly are complete, but before scheduling. Any material change after approval should trigger another check of the edited area and anything it affects.
What is the difference between email proofreading and email QA?
Proofreading focuses on language accuracy. Email QA includes proofreading plus audience logic, personalization, links, tracking, rendering, accessibility, compliance, approvals, and send configuration.
How do I test personalization safely?
Use controlled test records that represent complete, incomplete, unusually long, localized, and edge-case data. Confirm every fallback and dynamic branch without using a real customer as an accidental test recipient.
Does Gard replace an email preview or link checker?
No. Gard helps review text inside visual assets. Keep using your email platform or rendering service to test links, audience rules, personalization, HTML behavior, inbox compatibility, and delivery configuration.
Disclaimer: Gard provides automated design proofing powered by advanced AI. While highly accurate, we advise users to always conduct a final manual review of high-stakes business, medical, or legal graphics before sending to production.